Bathroom mosaic: tips & advice
When should you install a bathroom mosaic?
During your architect’s design phase—or when you’re renovating—you can plan a mosaic installation for your bathroom. Anticipate the budget, waterproofing, and timeline; define the surfaces; choose materials and finishes; lock in designs, epoxy grout, and maintenance; then coordinate your architect, mosaic tiler, and Magic Mosaic to ensure a durable, beautiful, functional, and coherent result.
Where to place mosaic in your bathroom?
Glass-paste mosaic works well on shower walls or as a feature wall. Around a mirror, it creates a distinctive frame. For floors, choose robust materials (marble, natural stone, ceramic) with an anti-slip finish suited to wet areas. You can mix and match: glass-paste on the wall + marble or pebble on the floor for a spa-like look.
To choose your mosaic’s visual, pick a photo you’d like to transform into a mosaic, then experiment with our web designer at this link.
How to install your bathroom mosaic?
While skilled DIYers can manage, we recommend hiring a professional mosaic tiler for a top-tier finish. At Magic Mosaic, we can connect you with experienced pros. We recommend epoxy grout; colored epoxy options also let you play with contrast. For long-term care, a sponge and white vinegar will keep your mosaics clean.
While skilled DIYers can manage, we recommend hiring a professional mosaic tiler for a top-tier finish. At Magic Mosaic, we can connect you with experienced pros. We recommend epoxy grout; colored epoxy options also let you play with contrast. For long-term care, a sponge and white vinegar will keep your mosaics clean. Epoxy grout—more resistant to stains and chemicals—simplifies maintenance.
Boosting your home’s value
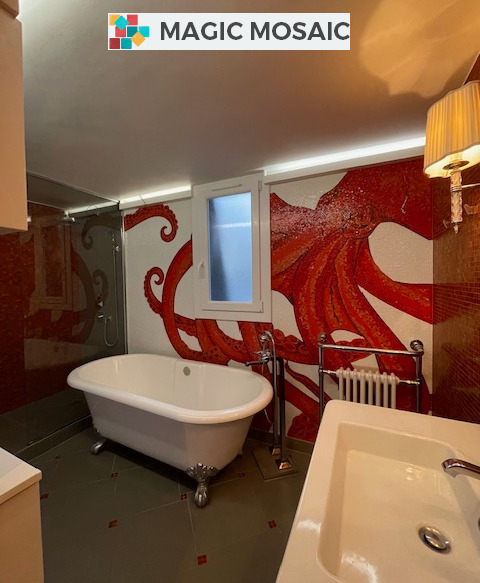
A bathroom mosaic can add resale value. Choose aquatic themes (octopus, dolphin, mermaid, corals, etc.) with vivid colors—blue, green, red—or draw inspiration from museums or Roman sites. In Roman times, mosaics showcased a household’s wealth and feats.
How to use our web designer for your bathroom mosaic
- Select a photo to transform into a mosaic.
- Enter the mosaic’s dimensions.
- Specify whether it’s for wall or floor.
- Enter your details, then click “Create my mosaic.”
- You’ll get a simulation of your artistic mosaic. Our sales team will contact you with a quote.
Example use cases for the bathroom designer
Case 1 — Shower wall, corals
Dimensions: 120 × 200 cm (shower wall)
Placement: wall
Material: glass-paste
Motif/photo: abstract blue/green corals
Grout: white epoxy (soft contrast)
Effect: lagoon vibe, focal point behind the column
Case 2 — Sink backsplash, stylized mermaid
Dimensions: 120 × 60 cm (backsplash)
Placement: wall
Material: glass-paste
Motif/photo: minimalist mermaid silhouette
Grout: pearlescent epoxy
Effect: refined decorative touch around the mirror
Case 3 — Walk-in shower floor, wave
Dimensions: 90 × 120 cm (floor)
Placement: floor
Material: anti-slip marble (or pebbles)
Motif/photo: wave line flowing from the drain
Grout: gray epoxy (better at hiding dirt)
Effect: guides water flow + safety
Case 4 — Bathtub apron, graphic octopus
Dimensions: 170 × 60 cm (apron)
Placement: wall
Material: glass-paste
Motif/photo: stylized octopus, dark solid on light ground
Grout: black epoxy (accent)
Effect: signature piece visible from the entrance
Case 5 — Shower niche, subtle dolphin
Dimensions: 30 × 60 cm (back panel only)
Placement: wall
Material: glass-paste
Motif/photo: tone-on-tone dolphin
Grout: epoxy matched to the background
Effect: premium detail without overwhelming the space
Case 6 — Accent wall panel, colorful reef
Dimensions: 100 × 250 cm (behind vanity)
Placement: wall
Material: glass-paste
Motif/photo: multicolored corals on a sandy base
Grout: sand-tone epoxy
Effect: “art wall” that replaces wallpaper
Case 7 — Bathroom floor, mosaic “rug”
Dimensions: 200 × 200 cm (central rug 120 × 80 cm)
Placement: floor
Material: marble
Motif/photo: antique-inspired geometric frieze with blue/green accents
Grout: light-gray epoxy
Effect: frames the vanity; spa/antique feel
Case 8 — Mirror surround, coral frieze
Dimensions: 6–8 cm frame around an 80 × 60 cm mirror
Placement: wall
Material: glass-paste
Motif/photo: mini coral frieze in repetition
Grout: white or pearl epoxy
Effect: luminous halo, color echo with the rest
Case 9 — Wall-hung WC cladding, school of fish
Dimensions: 120 × 80 cm (boxing)
Placement: wall
Material: glass-paste
Motif/photo: fish silhouettes in blue/green gradient
Grout: off-white epoxy
Effect: animates a technical volume while staying discreet
Case 10 — Island tub backsplash, gentle swell
Dimensions: 200 × 90 cm panel behind the tub
Placement: wall
Material: glass-paste
Motif/photo: watercolor-style lagoon blue ripples
Grout: pearl epoxy
Effect: soothing backdrop, spa atmosphere around the bath
Ready to take action? Imagine, personalize, and create your complete bathroom project—guided step by step, online at this practical, safe, fast, and inspiring link.
The “Octopus” mosaic bathroom project.